> ## Documentation Index
> Fetch the complete documentation index at: https://friendli.ai/docs/llms.txt
> Use this file to discover all available pages before exploring further.
# Dataset Specifications and Upload Guide
> Upload and manage datasets for Friendli Dedicated Endpoints. Covers supported formats, size limits, splits, versioning, and the upload process.
export const RoundedBorderBox = ({children, caption}) =>
{children}
{caption &&
{caption}
}
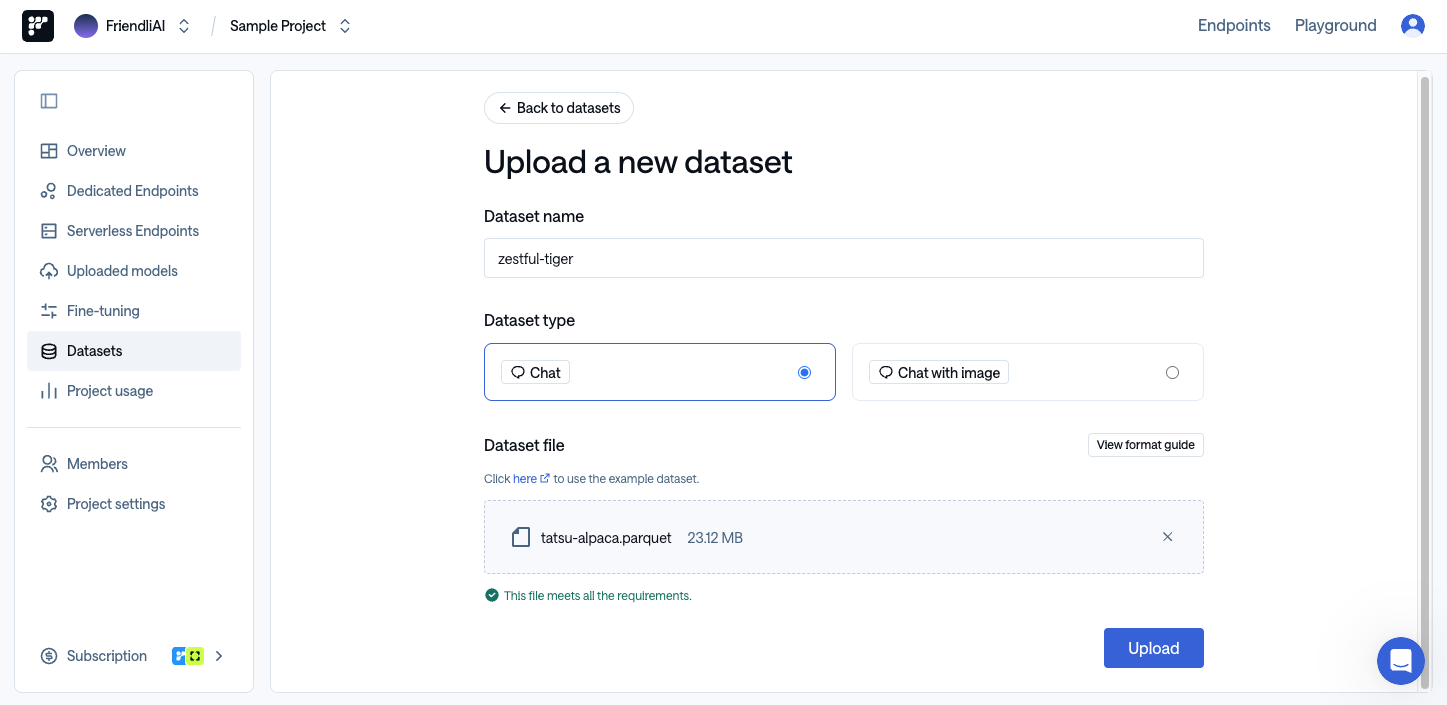
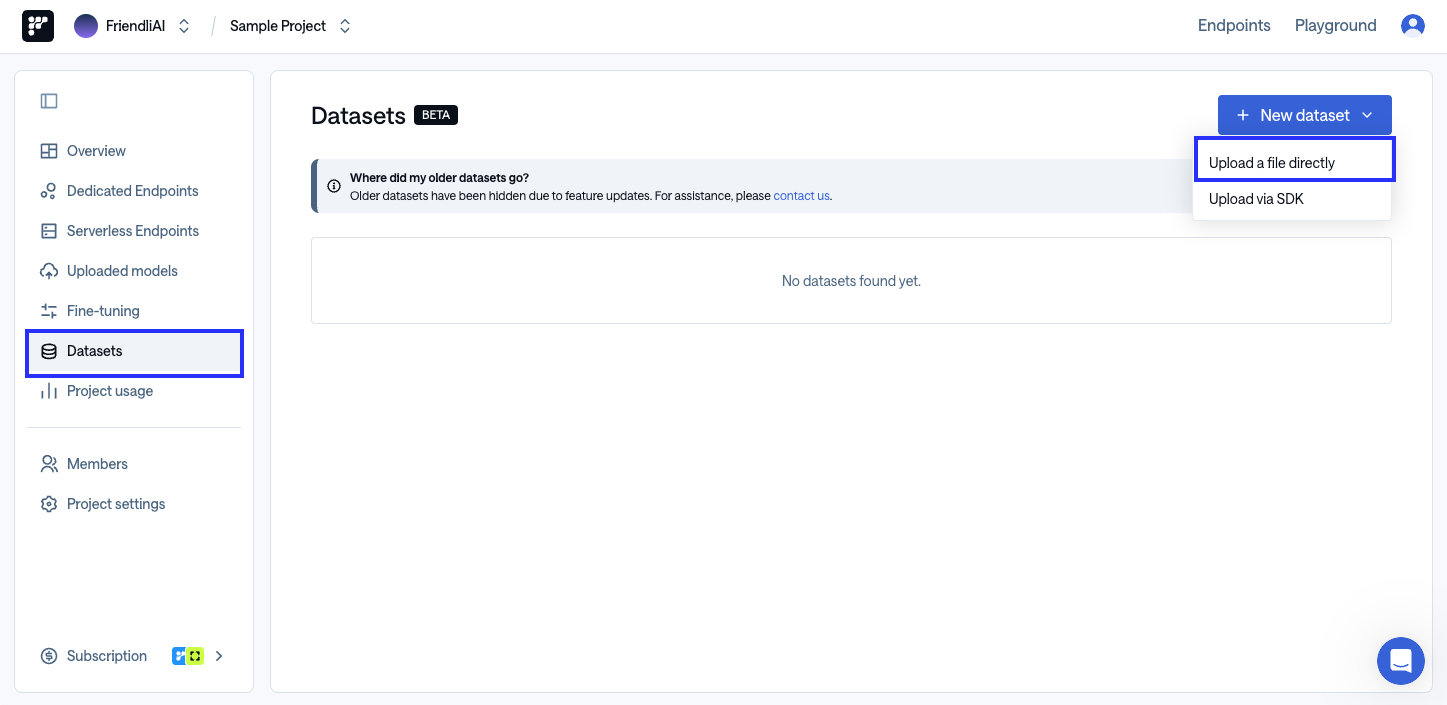 Click the File Upload Area in the Dataset file section, or drag and drop the file you want to upload. Then click the **'Upload'** button to start uploading.
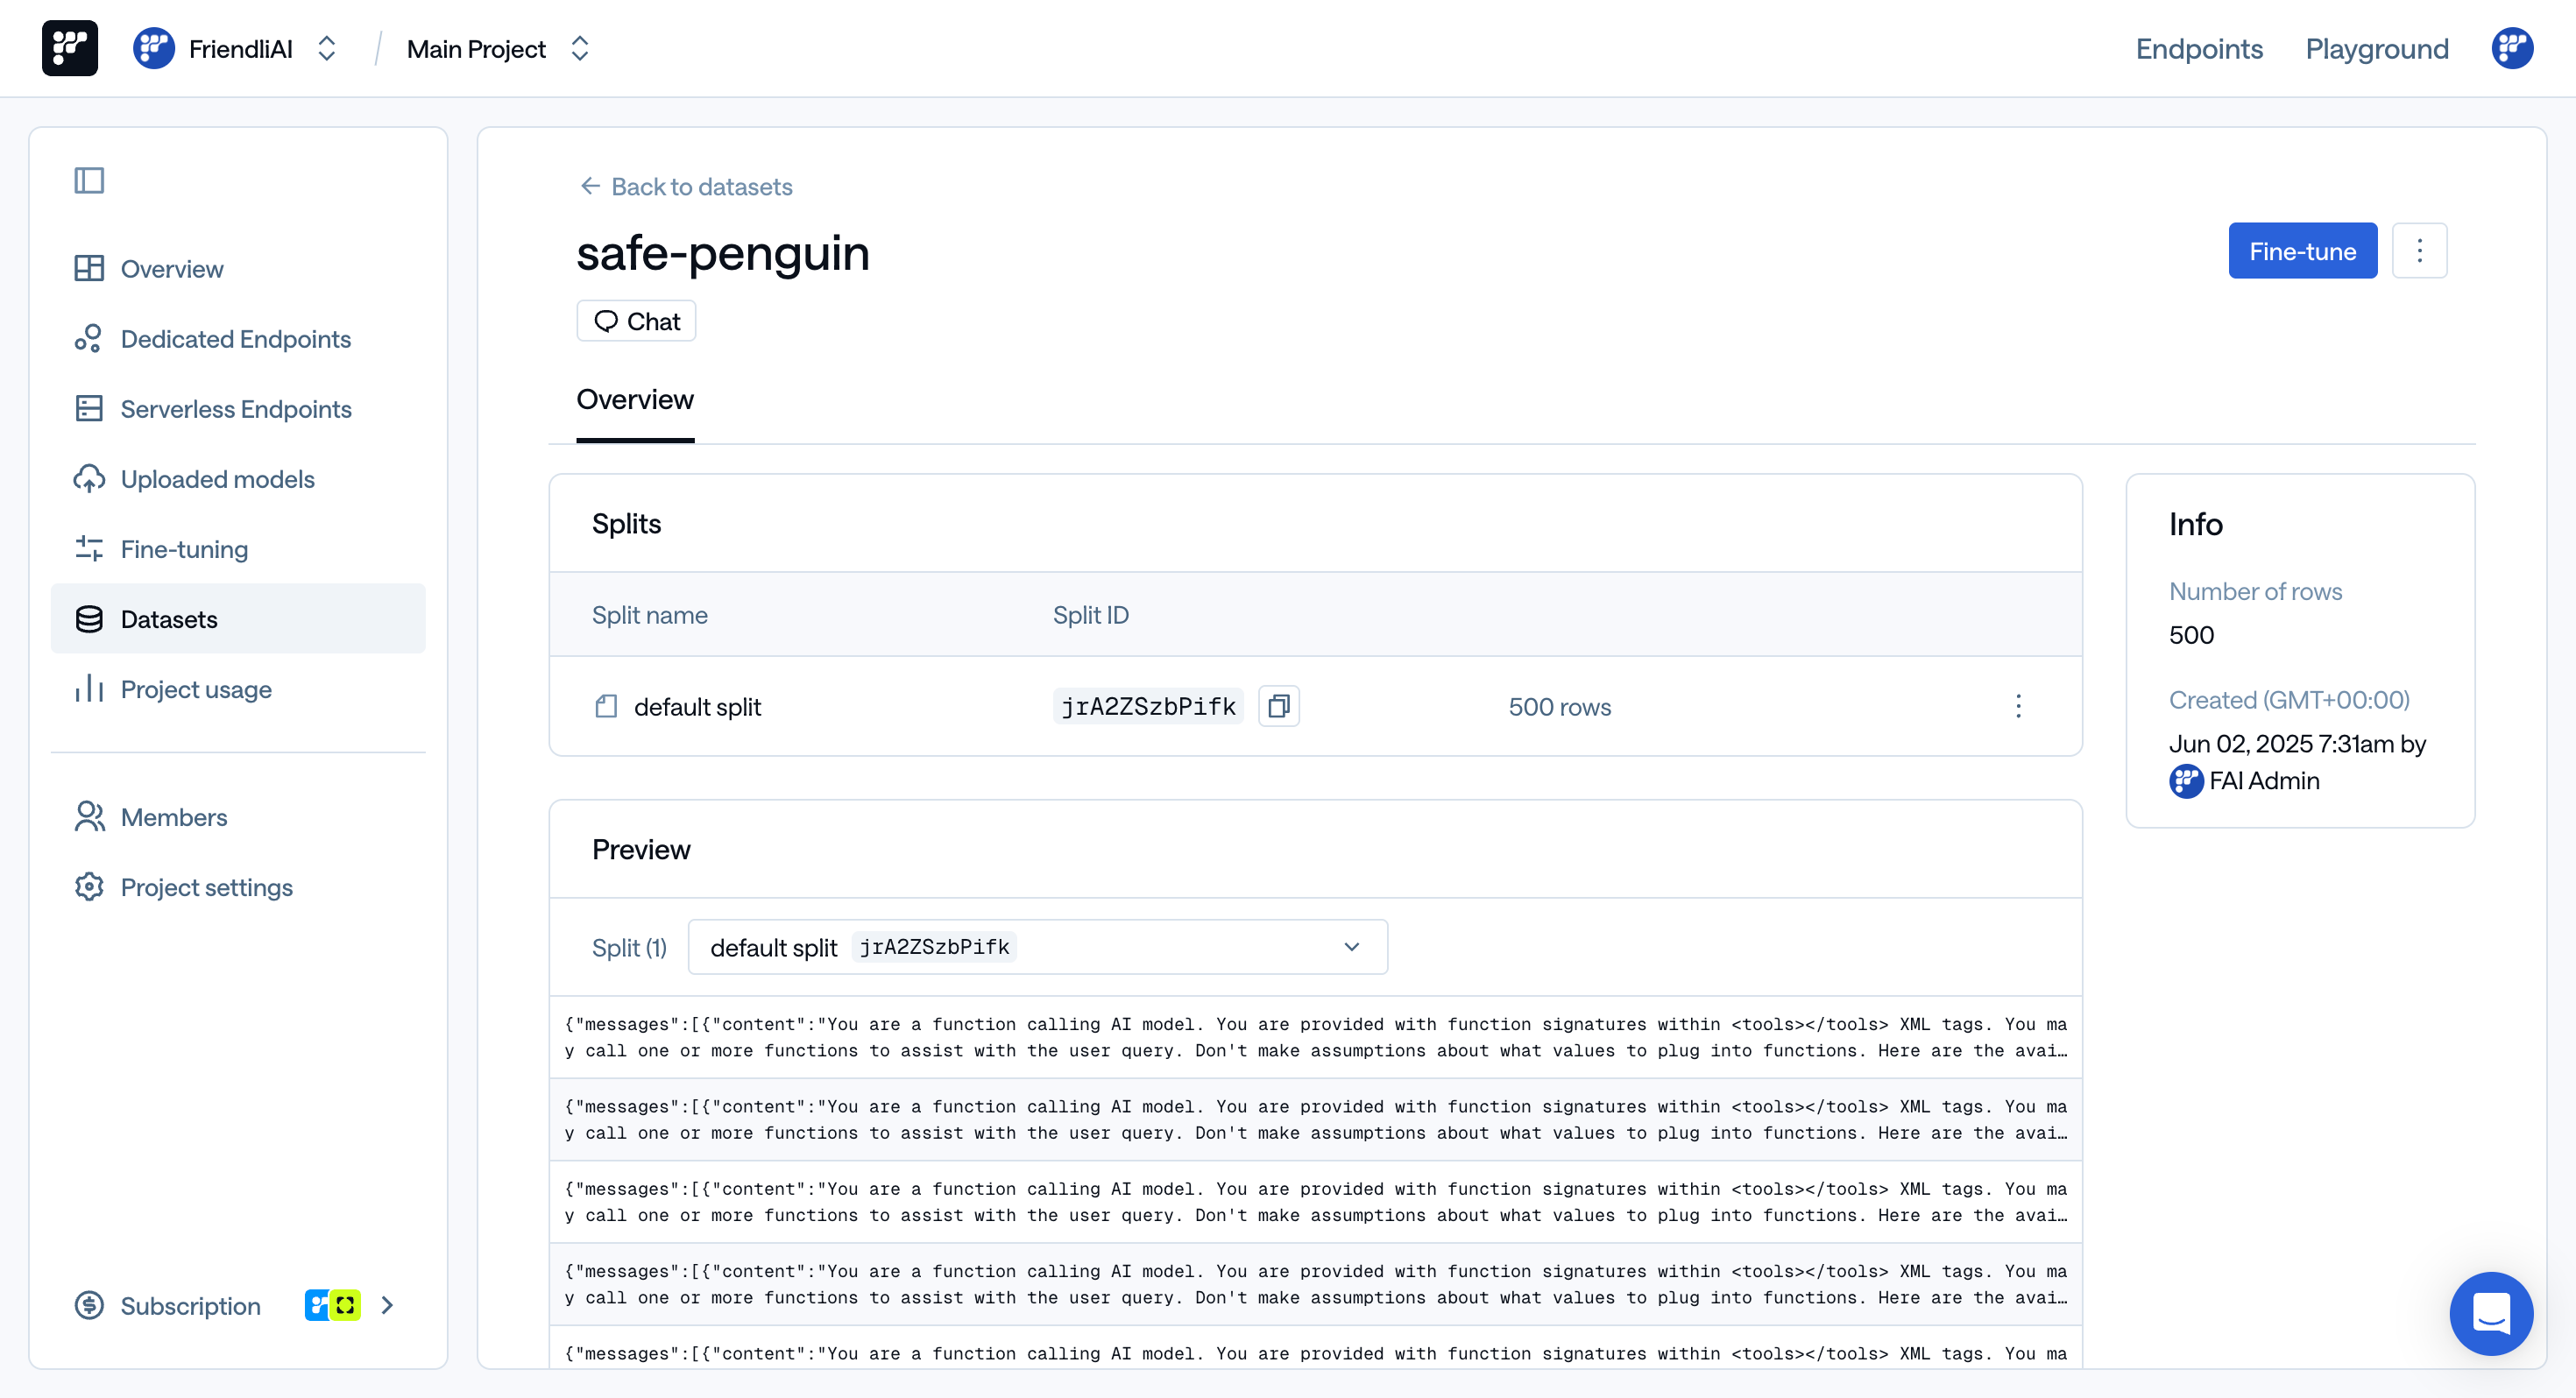
 Friendli uploads the dataset progressively in the background. Once the upload is complete, you can rename it, add splits, and preview each split.
 ### Prerequisites
1. Head to [Friendli Suite](https://friendli.ai/suite) and create an account.
2. Issue a **Personal API Key** by going to [Personal Settings > API Keys](https://friendli.ai/suite/~/setting/keys).
Make sure to copy and store it securely in a safe place as you won't be able to see it again after refreshing the page.\
For detailed instructions, see [Personal API Keys](/guides/suite/personal-api-keys).
### Step 1. Prepare Your Dataset
Your dataset should be a conversational dataset in `.jsonl` or `.parquet` format, where each line represents a sequence of messages. Each message in the conversation should include a `"role"` (e.g., `system`, `user`, or `assistant`) and `"content"`. For VLM fine-tuning, user content can contain both text and image data (Note that for image data, we support URL and Base64).
Here's an example of what it should look like. Note that it's one line but beautified for readability:
```json theme={null}
{
"messages": [
{
"role": "system",
"content": "You are a helpful assistant."
},
{
"role": "user",
"content": [
{
"type": "image",
"image": "https://huggingface.co/datasets/huggingface/documentation-images/resolve/main/bee.jpg"
},
{
"type": "image",
"image": "data:image/png;base64,"
},
{
"type": "text",
"text": "Describe this image in detail."
}
]
},
{
"role": "assistant",
"content": "The image is a bee."
}
]
}
```
You can access our example dataset ['FriendliAI/gsm8k'](https://huggingface.co/datasets/FriendliAI/gsm8k) (for Chat), ['FriendliAI/sample-vision'](https://huggingface.co/datasets/FriendliAI/sample-vision) (for Chat with image) and explore some of our quantized generative AI models on [our Hugging Face page](https://huggingface.co/FriendliAI).
### Step 2. Upload Your Dataset
Once you have prepared your dataset, you can upload it to Friendli using the [Python SDK](/sdk/python-sdk).
#### Install the Python SDK
First, install the Friendli Python SDK:
```bash theme={null}
# Using pip
pip install friendli
# Using poetry
poetry add friendli
```
#### Upload Your Dataset
Use the following code to create a dataset and upload your samples:
```python theme={null}
import os
from friendli.friendli import SyncFriendli
from friendli.models import Sample
TEAM_ID = os.environ["FRIENDLI_TEAM_ID"]
PROJECT_ID = os.environ["FRIENDLI_PROJECT_ID"]
TOKEN = os.environ["API_KEY"]
# Read dataset file and parse each line as a Sample
with open("dataset.jsonl", "rb") as f:
data = [Sample.model_validate_json(line) for line in f]
with SyncFriendli(
token=TOKEN,
x_friendli_team=TEAM_ID,
) as friendli:
# Create a new dataset with TEXT and IMAGE modalities
with friendli.dataset.create(
modality=["TEXT", "IMAGE"],
name="my-vlm-dataset", # name of the dataset
project_id=PROJECT_ID,
) as dataset:
# Upload samples to the dataset
# Each line from your dataset file becomes a separate sample
dataset.upload_samples(
samples=data,
split="train", # name of the split to upload to
)
```
#### How It Works
Friendli Python SDK doesn't upload your entire dataset file at once. Instead, it processes your dataset more efficiently:
1. **Reads your dataset file line by line**: Each line is parsed as a `Sample` object containing a conversation with messages.
2. **Creates a dataset**: A new dataset is created in your Friendli project with the specified modalities (`TEXT` and `IMAGE`).
3. **Uploads each conversation as a separate sample**: Rather than uploading the entire file, each conversation (line in the dataset file) becomes an individual sample in the dataset.
4. **Organizes by splits**: Samples are organized into splits like "train", "validation", or "test" for different purposes.
#### Environment Variables
Make sure to set the required environment variables:
```bash theme={null}
export API_KEY="your-api-key"
export FRIENDLI_TEAM_ID="your-team-id"
export FRIENDLI_PROJECT_ID="your-project-id"
```
You can find your Team ID and Project ID in the URL of Friendli Suite, formatted as `https://friendli.ai///...`.
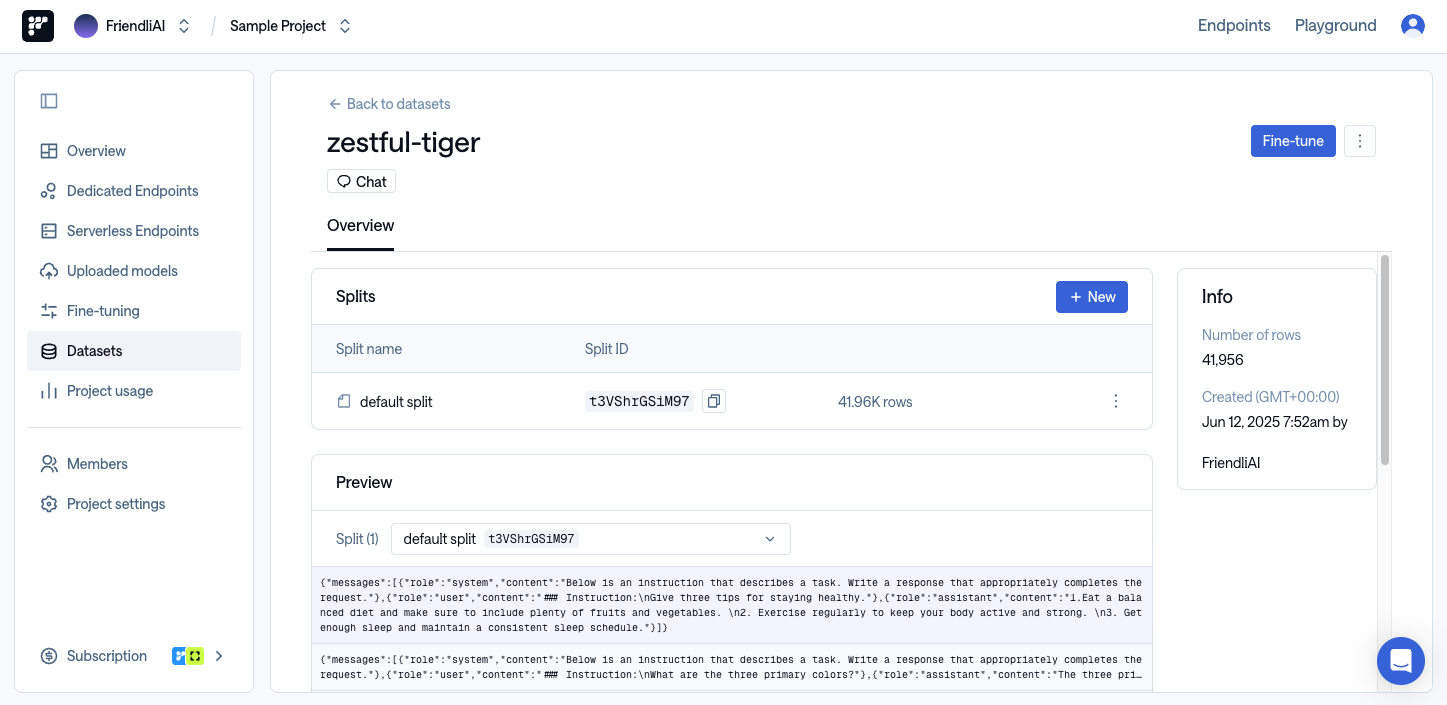
#### View Your Dataset
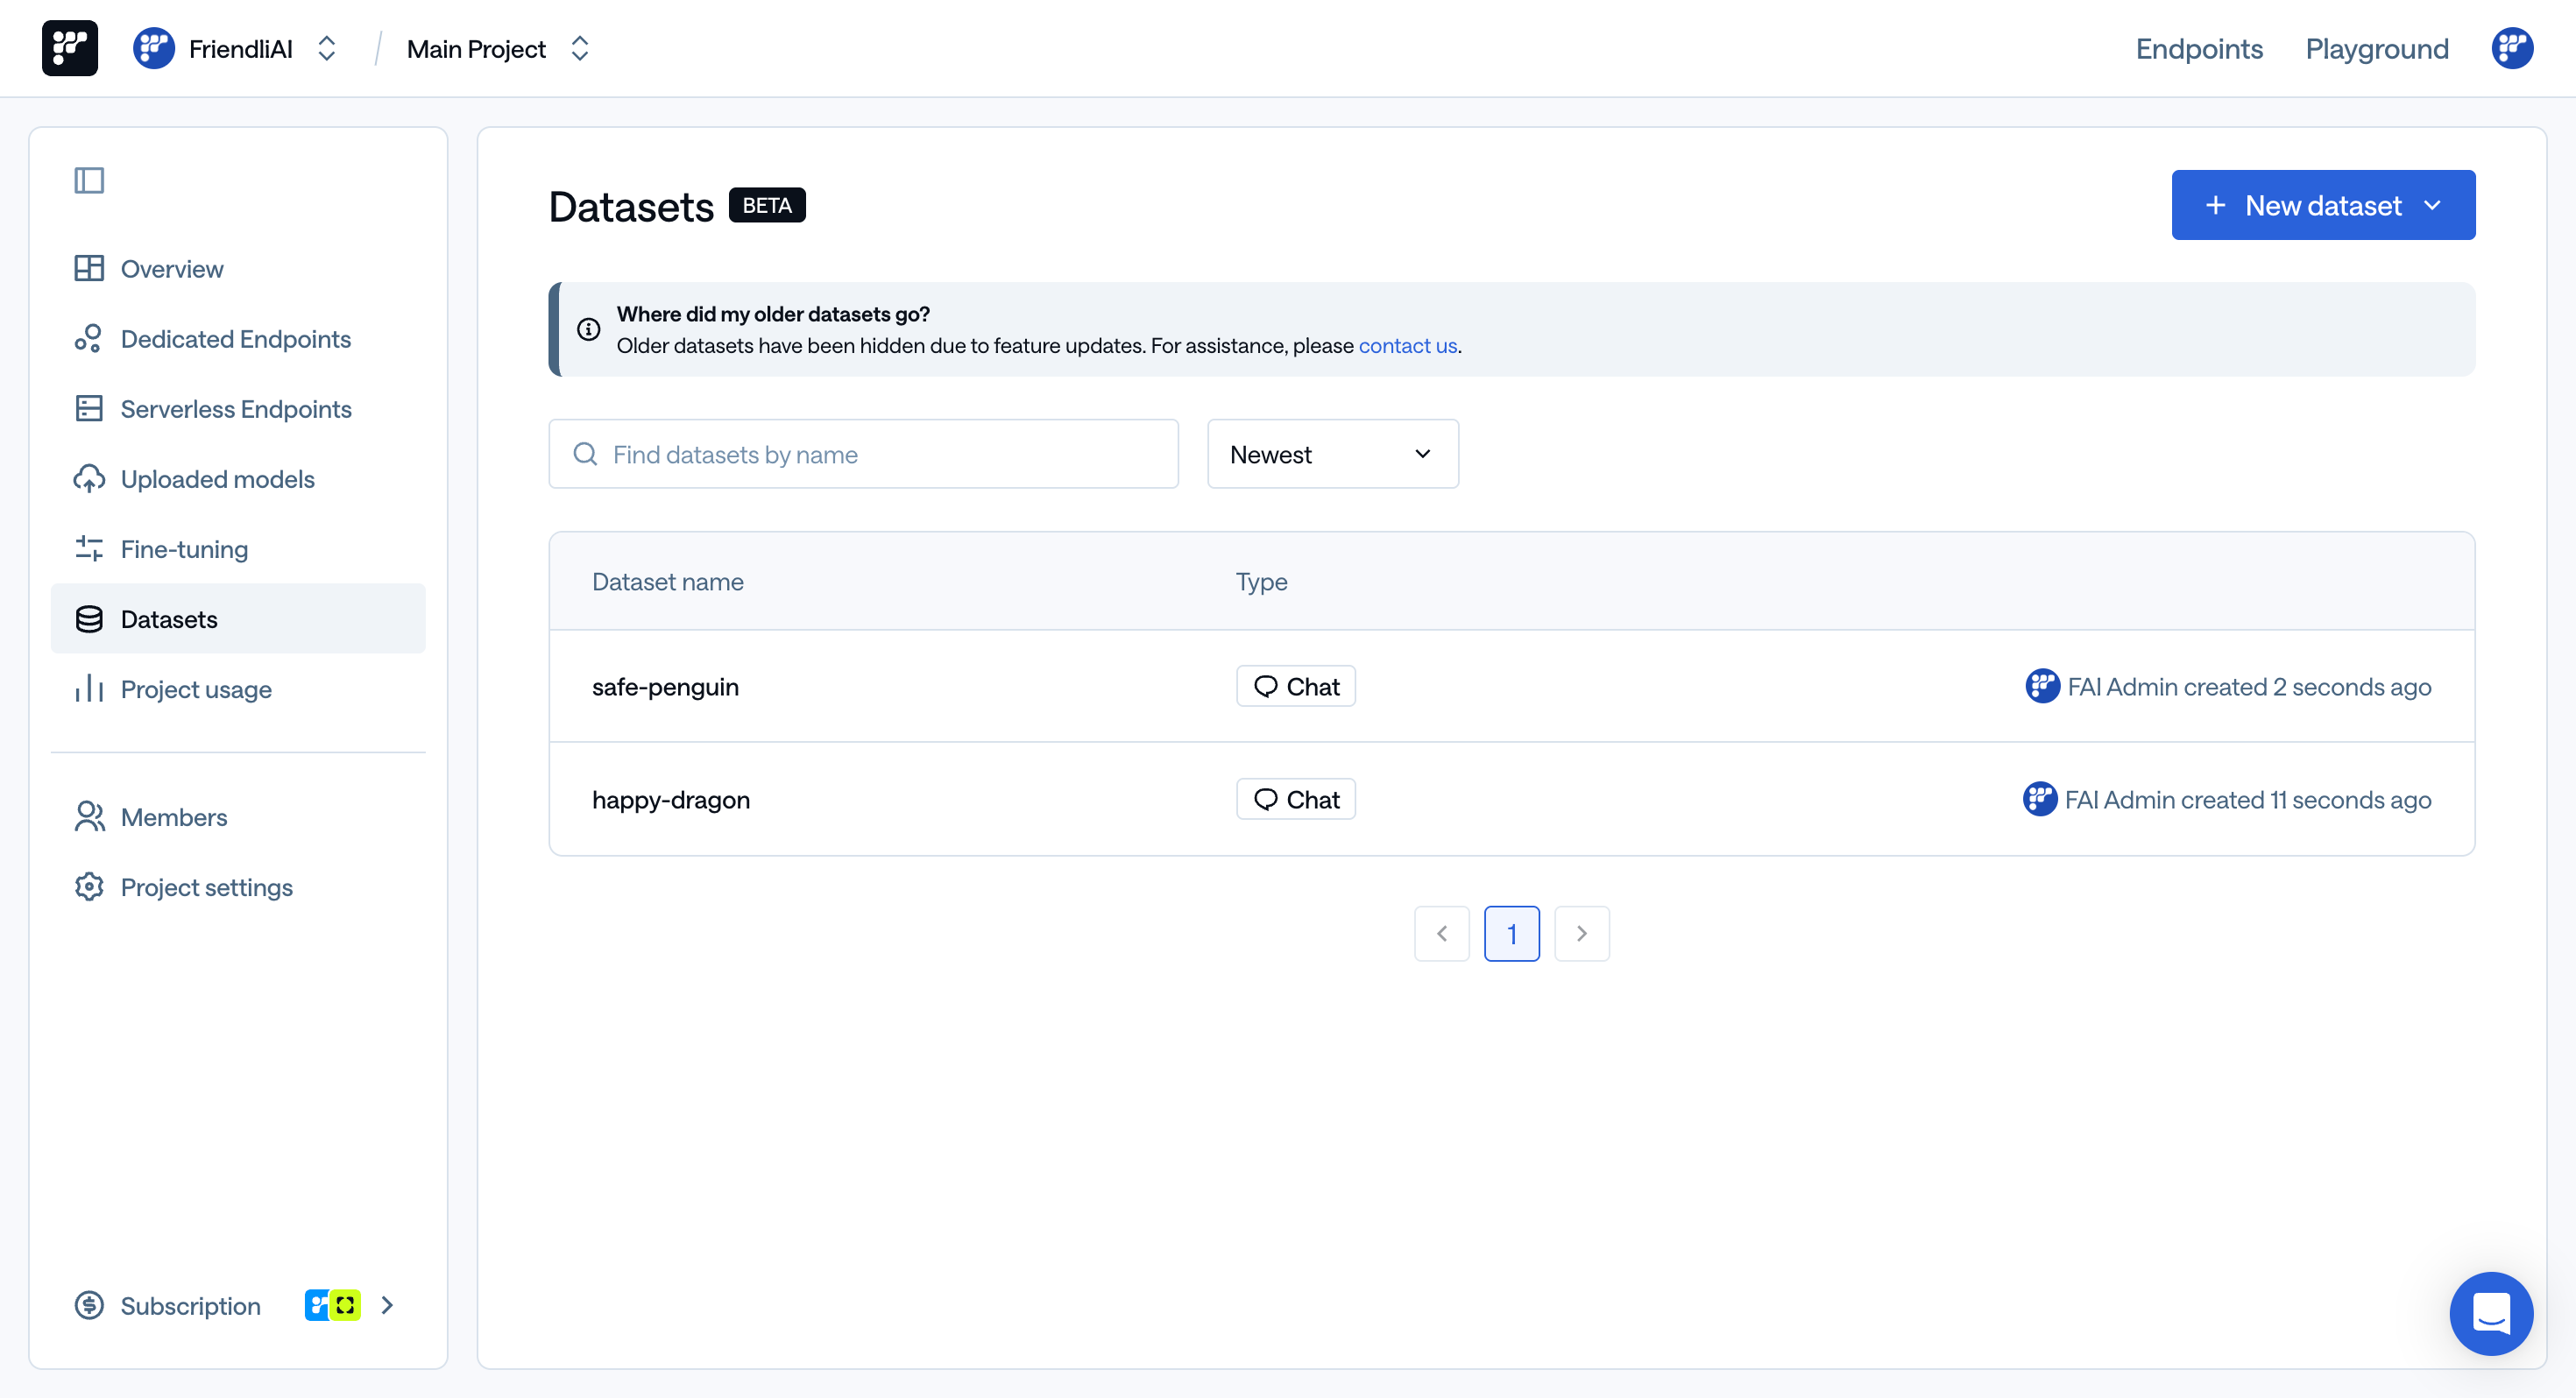
To view and edit the datasets you've uploaded, visit [Friendli Suite > Datasets](https://friendli.ai/suite/~/datasets).
### Prerequisites
1. Head to [Friendli Suite](https://friendli.ai/suite) and create an account.
2. Issue a **Personal API Key** by going to [Personal Settings > API Keys](https://friendli.ai/suite/~/setting/keys).
Make sure to copy and store it securely in a safe place as you won't be able to see it again after refreshing the page.\
For detailed instructions, see [Personal API Keys](/guides/suite/personal-api-keys).
### Step 1. Prepare Your Dataset
Your dataset should be a conversational dataset in `.jsonl` or `.parquet` format, where each line represents a sequence of messages. Each message in the conversation should include a `"role"` (e.g., `system`, `user`, or `assistant`) and `"content"`. For VLM fine-tuning, user content can contain both text and image data (Note that for image data, we support URL and Base64).
Here's an example of what it should look like. Note that it's one line but beautified for readability:
```json theme={null}
{
"messages": [
{
"role": "system",
"content": "You are a helpful assistant."
},
{
"role": "user",
"content": [
{
"type": "image",
"image": "https://huggingface.co/datasets/huggingface/documentation-images/resolve/main/bee.jpg"
},
{
"type": "image",
"image": "data:image/png;base64,"
},
{
"type": "text",
"text": "Describe this image in detail."
}
]
},
{
"role": "assistant",
"content": "The image is a bee."
}
]
}
```
You can access our example dataset ['FriendliAI/gsm8k'](https://huggingface.co/datasets/FriendliAI/gsm8k) (for Chat), ['FriendliAI/sample-vision'](https://huggingface.co/datasets/FriendliAI/sample-vision) (for Chat with image) and explore some of our quantized generative AI models on [our Hugging Face page](https://huggingface.co/FriendliAI).
### Step 2. Upload Your Dataset
Once you have prepared your dataset, you can upload it to Friendli using the [Python SDK](/sdk/python-sdk).
#### Install the Python SDK
First, install the Friendli Python SDK:
```bash theme={null}
# Using pip
pip install friendli
# Using poetry
poetry add friendli
```
#### Upload Your Dataset
Use the following code to create a dataset and upload your samples:
```python theme={null}
import os
from friendli.friendli import SyncFriendli
from friendli.models import Sample
TEAM_ID = os.environ["FRIENDLI_TEAM_ID"]
PROJECT_ID = os.environ["FRIENDLI_PROJECT_ID"]
TOKEN = os.environ["API_KEY"]
# Read dataset file and parse each line as a Sample
with open("dataset.jsonl", "rb") as f:
data = [Sample.model_validate_json(line) for line in f]
with SyncFriendli(
token=TOKEN,
x_friendli_team=TEAM_ID,
) as friendli:
# Create a new dataset with TEXT and IMAGE modalities
with friendli.dataset.create(
modality=["TEXT", "IMAGE"],
name="my-vlm-dataset", # name of the dataset
project_id=PROJECT_ID,
) as dataset:
# Upload samples to the dataset
# Each line from your dataset file becomes a separate sample
dataset.upload_samples(
samples=data,
split="train", # name of the split to upload to
)
```
#### How It Works
Friendli Python SDK doesn't upload your entire dataset file at once. Instead, it processes your dataset more efficiently:
1. **Reads your dataset file line by line**: Each line is parsed as a `Sample` object containing a conversation with messages.
2. **Creates a dataset**: A new dataset is created in your Friendli project with the specified modalities (`TEXT` and `IMAGE`).
3. **Uploads each conversation as a separate sample**: Rather than uploading the entire file, each conversation (line in the dataset file) becomes an individual sample in the dataset.
4. **Organizes by splits**: Samples are organized into splits like "train", "validation", or "test" for different purposes.
#### Environment Variables
Make sure to set the required environment variables:
```bash theme={null}
export API_KEY="your-api-key"
export FRIENDLI_TEAM_ID="your-team-id"
export FRIENDLI_PROJECT_ID="your-project-id"
```
You can find your Team ID and Project ID in the URL of Friendli Suite, formatted as `https://friendli.ai///...`.
#### View Your Dataset
To view and edit the datasets you've uploaded, visit [Friendli Suite > Datasets](https://friendli.ai/suite/~/datasets).